Tuesday, April 29, 2014

Grading Assessments in Schoology

Tuesday, April 29, 2014

Tuesday Tech Tip: Grading Assessments in Schoology


This week we will explore grading assessments in Schoology.


Now that you have administered an assessment in Schoology you may think that you are done, but did you know you have options? Yes, options.

Some of those options include:

You might need to grade some subjective questions or you may want to review the submissions in the event you need to offer partial credit.  
To do this:

  • Choose VIEW BY STUDENT
  • Click VIEW ATTEMPTS
Here you can review and score questions and offer comments if you would like to provide that level of feedback.

What about grading all submissions for a particular question? You can do that too.

  • Choose VIEW BY QUESTION.
This is also a good place to analyze how your class performed as a whole on each question.

Wondering why all of your students did so poorly on question 5? Surely, you wrote a great question and selected the correct answer. But in the event that you need to adjust the answer and regrade, no problem. To change the answer for all, go to your test and change the answer. This will adjust the scores in the gradebook accordingly. If you need to dig deeper into a particular student's response and override a score, you can do that too by reviewing the question in question.

Another consideration is analyzing mastery.  For more information about Mastery in Schoology, please visit our post from March 25th or a section from the Schoology Help Guide.

Yes, Schoology is amazing for a variety of things. Grading assessments after the assessment is complete will help you with monitoring student progress and thus assist in the PLAN-TEACH-MONITOR-ADJUST cycle.

If you need additional assistance for this or any other instructional technology topic, please contact us!

Tuesday, April 22, 2014

Using Question Banks in Schoology


Tuesday, April 22, 2014

Tuesday Tech Tip: Using Question Banks in Schoology


As summer quickly approaches, many of you are shifting your thinking to get ready for fall.  Part of this preparation can include adding tests and quizzes for next year into your Schoology resources.  Whether you are working as part of a team, department, or just by yourself, test banks can be a great way to store test/quiz questions for future courses. This week’s post uses information from Schoology’s Help Center and will help support you in effectively managing question banks in Schoology.

Creating Question Banks in Resources


Question banks allow you to create a repository of test questions in your Resources. You can create Question Banks in Personal and Group Resources.
To create a question bank, follow these steps:
  1. Click on the Resources area on the top menu, and select the option for Personal or Group resources.
  2. Click into the collection or group in which you'd like to add a question bank.
  3. Click on the Add Resources button.
  4. Select the option to Add Question Bank.
  5. Enter a name for the Question Bank, and click Create to complete.
To add questions from Resources, follow these steps:
  1. Click on a Question Bank in your Resources.
  2. Click the button to Add Question.
  3. Select from the following question types in Schoology:
    • True/False
    • Multiple Choice
    • Short-Answer/Essay Questions
    • Fill in the Blank
    • Matching
  4. Fill out the question form.
  5. Click Create Question to complete.

Creating Question Banks and adding questions from within a Course


If you already have a test/quiz with questions in a course, you can add these questions to Question Banks.
To create Question banks from within a course, follow these steps:
  1. Click on the Courses area on the top menu, and select a course with tests/quizzes.
  2. Click on a test/quiz whose questions you'd like to save in a question bank.
  3. To add all questions to a question bank, click on the Options button in the Questions tab.
  4. Select the option to Add Questions to Bank.
  5. To add a select question to a question bank, click on the gear to the right of the question.
  6. Select the option to Add to Bank.
  7. To create a new question bank to house the question(s), choose the option to create a New Question Bank.
  8. To add the question to an existing question bank, find the bank from within the options available in the menu.
  9. Click Add Questions to complete.
 

Adding questions from a Question Bank to a Test/Quiz


Once you have a Question Bank in Schoology, you can build tests/quizzes with questions from the banks.
To add questions to a test/quiz, follow these steps:
  1. Create a test/quiz, or click on the name of test/quiz into which you'd like to add questions.
  2. In the Questions tab of the test/quiz, click on the Add Question button.
  3. Select the option to import From Question Banks.
  4. Click on the Question Bank from which you'd like to import questions.
  5. Select the box next to the question(s) you'd like to import. To import all questions, select the box next to the Auto-select button.
  6. To randomly select questions from the bank, click on the Auto-select button.
    • Enter the number of questions you'd like to add to the test. This number cannot exceed the number of questions available in the bank.
    • Click on the Randomize Questions button to complete.
    • This feature adds a set number of questions to the test/quiz, and each student in the course will see the same set of questions.
  7. Enter a value in the field to the right to set a value for each question. To set a point value of each question in bulk, click the Set Points button.
  8. Click Add Questions to complete.

As always, if you will be building assessments and need some assistance with question banks or anything else within Schoology, please contact the Office of Instructional Technology.


Tuesday, April 15, 2014

Embedding Google Presentations into Schoology Assessments

Online testing has arrived!  Teachers and students have used ePats as a way to prepare for CMAS. The Office of Instructional Technology has put together some ideas on how we can create assessments in Schoology that are not only engaging, but also share common features.  Adding content into an assessment is a great way to create engaging and meaningful assessments.  A common feature within the Social Studies CMAS is shown below as a series of sources that students toggle between to answer questions.  


This format provides the opportunity for students to analyze and connect multiple sources. Teachers can gather images, maps, primary sources, graphs, reading excerpts, Thinking Maps, tables, political cartoons, quotes, etc. and add them as separate sources connected to a common theme.  


Let’s give it a try:

You and your friends are getting together to go to a Rockies game. Sadly, one of your friends has an injured leg. Using sources 1 and 4 determine where you would go for pregame activities that would minimize the walk to the stadium.


If you said the Falling Rock Tap House would be the place to go, you are correct!


Are you interested in adding Google Presentations to your assessments?  Here’s how it can be done in 7 steps.  Follow these steps to create the presentation and insert or embed it into a test or quiz in Schoology.


Here are some tips to keep in mind:

  1. Teachers can ask several questions based off of one Google Presentation with multiple sources.
  2. Teachers can create and embed their own Google presentation. It does not have to have sources on the top. However, we have templates for 2, 3, 4, 5 and 6 sources. (If you are not a CCSD teacher, use this link to access the shared folder).
  3. You can change the size of your presentation to so it fits the question window. Just drag a corner of the presentation box when editing the quesiton in Schoology.
  4. If you want to try this out but need help, please do not hesitate to contact us!

Happy testing!

Tuesday, April 8, 2014

Tuesday Tech Tip: 5 Tips for Online Assessments in COLE 3.0/Schoology

April marks the beginning of CCSD's first foray into online state assessments with CMAS, so this month's blog posts will be about creating & using online assessments in COLE 3.0/Schoology.

For those whose students are testing this April, we'll have some tips on helping your students gain comfort in an online assessment environment.  For those whose students aren't testing (or aren't testing yet), these posts can give you some ideas about how you could utilize online assessments in your classroom as an instructional tool.

The basics for creating an assessment (including adding questions, quiz settings, and adding files) can be found in Schoology's Help Center.  However, we wanted to highlight five things that might be helpful if you're building questions for an assessment.

  1. Use the "Insert Content" option to add images, audio, video, links, and more to questions.  Most people are comfortable using the text editor, but one of your options when creating quiz questions is to use the "Insert Content" pull-down.  Choosing "Image/Media" lets you either upload a picture, movie, or sound file from your computer or paste in a link or embed code to insert something from the web (as of  February 2015, you can directly add YouTube, Google Drive or other Resource App sources you've connected in Schoology).  After adding images or media, you can click on them to do more editing, like for resizing.  You can also add links or special symbols, and if you're a math teacher, you can use the built-in equation editor  or LaTex for questions that require equations or math symbols.  Finally, if you want to show additional information when mousing over certain words (like speech bubbles), use the "Tooltip" option (highlight the words that will have the tooltip first).
  2. Use the rich text editor for answers in multiple choice, matching and ordering question types. The rich text editor comes up automatically when creating questions, but you can also use a rich text editor for answers, if you're building multiple choice, matching, or ordering question types.  Mousing over any answer blank will show a small pencil icon in the right corner.  Clicking on that will expand the answer field into a rich text editor window where you can format text, add links, or insert content (images/media, links, symbols, equations, etc.).
  3. Include audio support for students.  If your students need audio support, you can either upload pre-recorded audio (using the "Insert Content" method mentioned above) or you can use the microphone icon to record audio or web cam video directly into Schoology (time limits are 10 minutes for web cam video and 11 minutes for audio).  You can do this for individual questions, answers, or the overall quiz instructions.  (Any information you put into the "Instructions" area for a quiz is available during the entire quiz.)
  4. Use the "Text" option for information, graphics, or media that apply to multiple questions underneath.  If you have an image, video, or anything else that you just need kids to view or use for multiple questions, use the "text" option to insert it.  It won't be tied to a specific question, so this works well for questions that rely upon the same graph, file, image, video, etc.  (Don't use this if you will be scrambling the questions, though.)
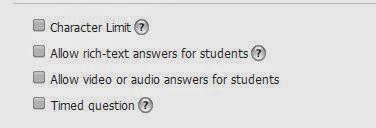
  5. Use the short answer/essay settings to expand response options for students.  Building an essay question is straight-forward, but you do have some options in how students can answer the question.  The response options include setting character limits, letting students respond with a rich text editor (helpful if they need to insert media, links, or equations), allowing students record an audio or video response, or timing the question.

As a reminder, it's a good idea to align your questions to standards or objectives if you want to track how students do on specific learning targets.  (You can read more about that in our previous blog post on alignment.)  In the coming weeks, we'll be posting about embedding external content to mimic PARCC & CMAS test formats, embedding external content, and using assessment reports.

If you will be building assessments and would like some help, don't hesitate to contact the Office of Instructional Technology.